


Introduction
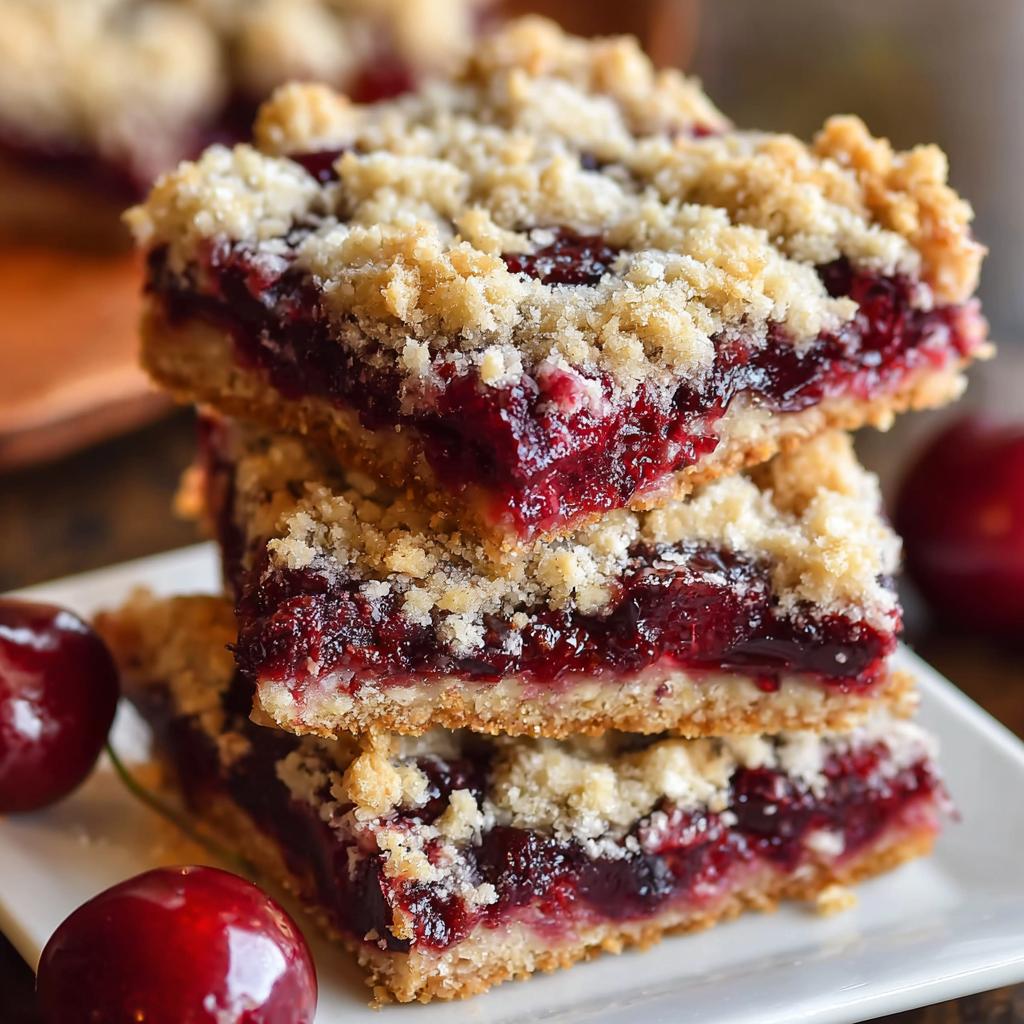
Cherry pie bars are a delightful twist on the classic cherry pie, offering a handheld treat that is both satisfying and scrumptious. These bars encapsulate the essence of summer with their juicy cherry filling and buttery crust, making them perfect for any gathering or just a cozy evening at home.
With their soft, crumbly texture and vibrant flavor, cherry pie bars are a wonderful way to showcase fresh cherries when they are in season. If you're looking to impress your family and friends, this recipe comes together quickly and delivers a crowd-pleasing dessert.
Ingredients
- 2 cups all-purpose flour
The base of the crust and topping, flour provides structure. It absorbs moisture and helps bind the ingredients to create a tender and flaky texture. - 1 cup unsalted butter
Butter adds richness and flavor to the bars. When chilled and cut into the flour, it creates a flaky texture, while melted butter helps bind the crust. - 1 cup granulated sugar
Sugar sweetens the bar and enhances the flavors of the cherries. It also contributes to browning and texture. - 1/4 cup packed brown sugar
Brown sugar introduces a note of caramel and moisture, which enhances the overall flavor profile of the bars. - 1/2 teaspoon salt
Salt elevates the sweetness by providing balance. A little salt in the crust can prevent it from tasting flat. - 1 teaspoon vanilla extract
Vanilla adds a warm, aromatic flavor that complements the cherries. It enhances the overall taste without overpowering. - 3 cups fresh or frozen cherries
Cherries are the star of the recipe, providing natural sweetness and tartness. Fresh cherries will yield a vibrant flavor, while frozen can be more convenient. - 2 tablespoons cornstarch
Cornstarch acts as a thickener for the cherry filling, helping to absorb excess juices and create a more cohesive filling. - 1 tablespoon lemon juice
Lemon juice brightens the flavor of the cherries while balancing their sweetness. It also helps to enhance the natural acidity.
Directions & Preparation
Step 1: Preheat your oven to 350°F (175°C) and grease a 9×13 inch baking dish.
Preheating the oven ensures that the bars cook evenly throughout without any cold spots. Greasing the dish helps to prevent sticking, making it easier to remove the bars once they are baked.
Step 2: In a large bowl, mix flour, granulated sugar, brown sugar, and salt until well combined.
Combining the dry ingredients first allows for an even distribution of flavors and ensures that the sugar and salt are uniformly mixed into the flour. This step is crucial for achieving a consistent texture in the crust.
Step 3: Cut in the cold butter until the mixture is crumbly with pea-sized pieces.
Cutting in the butter incorporates it into the dry ingredients without melting it. This creates flaky layers in the crust, pivotal for achieving the desired texture.
Step 4: Reserve 1 cup of the crumb mixture for topping and press the remaining mixture into the bottom of the prepared baking dish.
Pressing the mixture firmly creates a stable base for the bars, ensuring they hold together when cut. This forms the foundation that will support the juicy cherry filling.
Step 5: In a separate bowl, combine the cherries, cornstarch, sugar, lemon juice, and vanilla extract. Toss to coat the cherries evenly.
Coating the cherries with cornstarch and sugar ensures that they become well-flavored and thickened as they cook. This mixture will help maintain the structure of the filling as it bakes.
Step 6: Spread the cherry mixture evenly over the crust in the baking dish.
Even distribution of the cherry filling prevents any one area from becoming overwhelmed or soggy. It allows for a consistent flavor and texture throughout the bars.
Step 7: Sprinkle the reserved mixture over the cherry filling evenly.
Adding the crumb topping creates a sweet contrast to the tart cherries and provides a crunchy texture. This step is essential for flavor balance and visual appeal.
Step 8: Bake for 30-35 minutes or until the topping is golden brown and the filling is bubbly.
Baking until golden browning indicates that the topping is perfectly cooked while ensuring the cherries have had time to bubble, allowing their flavors to meld beautifully.
Step 9: Allow to cool completely in the baking dish before slicing into bars.
Cooling is crucial as it allows the filling to set. Slicing too early can lead to messy bars, while waiting ensures that each piece holds its shape.
Perfecting the Cherry Filling
Using fresh or high-quality frozen cherries is key to a delightful filling. When fresh cherries are in season, they provide a burst of sweetness and excellent texture. If using frozen cherries, slight adjustments may be necessary, such as increasing the cornstarch to account for extra moisture. Additionally, macerating the cherries with sugar can enhance their flavor and allow the juices to seep out, creating an even more delectable filling.
Getting the Crust Just Right
Achieving the perfect crust relies heavily on the temperature and handling of the butter. Make sure the butter is cold for a flaky crust; avoid overmixing to ensure you retain pockets of butter within the flour mixture. For extra flavor and texture, consider using a mix of all-purpose flour and almond flour. A well-prepared crust will provide the necessary base to balance the luscious cherry filling.
Serving Suggestions for Cherry Pie Bars
Cherry pie bars are delightful on their own but can be enhanced with a scoop of vanilla ice cream or a dollop of whipped cream. For an elegant presentation, dust the bars with powdered sugar prior to serving. They are also perfect for summer picnics or gatherings, where their portable nature shines through, allowing guests to enjoy them with ease.
FAQs
What if my cherry filling is too runny?
If your cherry filling is too runny after baking, consider increasing the amount of cornstarch next time. You can also try cooking the cherries for a few minutes before filling.
Can I use different fruits instead of cherries?
Yes, feel free to substitute with other fruits like blueberries, raspberries, or even peaches. Adjust the sugar and cornstarch based on the sweetness and juiciness of the chosen fruit.
Why did my crust come out too hard?
Overmixing the crust or using warm butter can lead to a tough texture. Use cold butter and handle the mixture gently to keep the crust tender.
What can I do if my bars are overcooked?
If your bars are overcooked, and the crust is too crunchy, serve with a scoop of ice cream or whipped cream to balance the texture. Next time, check them a few minutes early.
Is there a way to make these bars less sweet?
You can reduce both the granulated sugar and brown sugar in the filling and crust by about a quarter, but keep in mind this may alter the texture of the crust.
What size is best for cutting the bars?
Cutting the bars into 2×2 inch squares makes for a good-sized portion, but you can adjust based on preference. Smaller squares work better for potlucks.
Conclusion
Cherry pie bars are a delightful addition to any dessert table, combining the charm of pie with the convenience of bars. Their sweet-tart filling and crumbly topping cater to various palates, making them a crowd favorite.
Whether you're enjoying them at a summer gathering or indulging in a quiet afternoon, these cherry pie bars are sure to evoke feelings of nostalgia. Embrace the joy of baking and share these treats with loved ones for an unforgettable experience.
Recipe Card
Notes
Additional serving suggestions: pair with a crisp salad, garlic bread, or roasted seasonal vegetables for balance.
For make-ahead, prep components separately and assemble just before heating to preserve texture.
Taste and adjust with acid (lemon/vinegar) and salt right at the end to wake up flavors.